
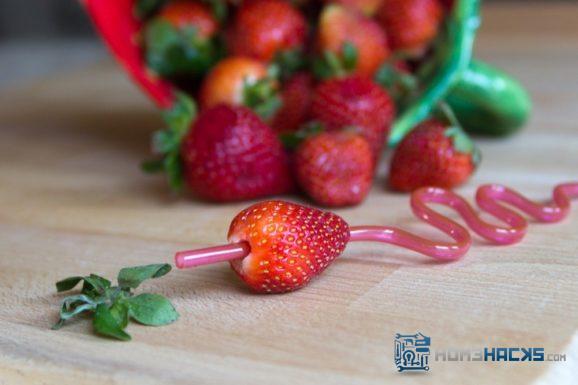
Why hack off the top half of a delicious strawberry when you can remove the stem more surgically? This simple hack for removing strawberry stems uses a straw to do the removal. If you have a re-usable metal straw, those tend to work best as they are relatively thin and sharp, and are less likely to bend than disposable plastic straws. A metal straw is also more practical than the bendy, pretty straw we included here. The steps to removing strawberry stems with a straw are pretty straight forward. Simply take one end of the straw and insert it into the narrow tip of your strawberry. Make sure you aim towards the center of the stem as you push the straw through to the other side. Once you get to the wide end of the strawberry, you the stem should pop right off, with minimal loss of the tasty bits of the strawberry. You can then blow through the straw to dispose of any core that gets stuck in there, or run the straw under a stream of water. Who would have thought straws were the secrete to removing strawberry stems?!
DIY Jewelry Organizer is One Simple and Cool Home Hack
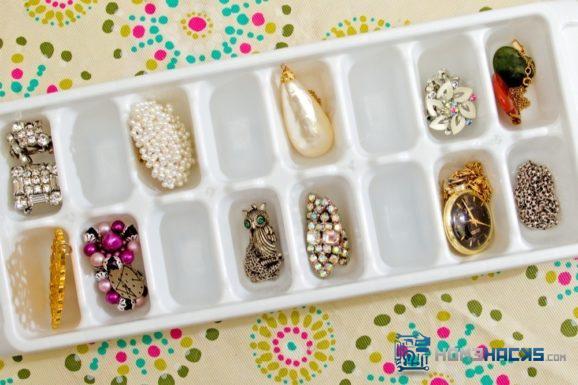
Jewelry has a way of taking over large swaths of storage. Necklaces can get tangled. Earrings can get lost. It can be a real challenge to find whatever jewelry you might be looking for. This DIY jewelry organizer is inexpensive, easy to implement, and you probably have the materials for it sitting in your kitchen. Simply take an ice cube tray of your choosing (or multiple ice cube trays if you have a lot of jewelry). Place each item of jewelry into one of the spaces normally used for ice cubes. Oval and less rectangular ice cube trays tend to work best for this DIY organizer because the jewelry is easier to scoop out. For Home Hacks bonus points, use one tray for each type of jewelry (eg. Rings, Necklaces, etc) and label the trays accordingly. We hope this DIY Jewelry Organizer hack helps tame and organize your jewelry clutter!
How to Keep White Wine Chilled Without Ice

Putting white wine on ice is guaranteed to get you permanently banned by your local sommelier. It will also likely result in some disapproving looks from friends and strangers alike. You can avoid the social stigma of iced white wine and still avoid the horror of your white wine getting warm with this simple and downright stylish home hack. Remove the stems from a bunch of your favorite grapes after washing them. Throw the grapes into a Ziploc bag and place it in your freezer. Allow the grapes to freeze. When you’re ready to sip your wine, put several of the grapes in the bottom of your glass. Pour the chilled white wine over the grapes and enjoy at your own leisurely pace! Your sommelier might still not approve, but who cares?! You’ll have chilled wine and probably a conversation starter as people admire your colorful, cool wine creation!
Slice Kiwi Using an Egg Slicer
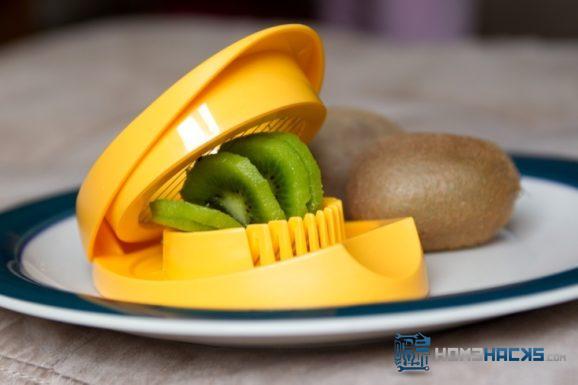
Whether you like your kiwi with or without the skin, you can slice kiwi using an egg slicer. Simply grab a washed kiwi, remove the skin if you prefer and place it in your egg slicer. Depending on the egg slicer you’re using, this hack is likely to work best after your kiwi is peeled. Happy kiwi slicing!
Turn an Empty Fireplace into a Decor Focal Point with Fireplace Candles
An empty fireplace no longer needs to be an eyesore thanks to this fireplace candles hack. Although they make large candle holders designed to fill a fireplace, you can achieve the same effect by filling a fireplace with candles of different widths and heights. If you don’t use candle holders in the fireplace, it’s best to use large candles for a better sense of scale. Scented candles are another way to add another layer to this hack. Pro tip, when lighting the fireplace candles, start at the back and work your way to the front!
DIY Statement Art on a Budget
Nothing brings a room to life and sets the mood like big art. You might think you can’t afford such an extravagance, but with these on-a-shoestring-budget ideas you will be surprised and delighted how affordable it can be. Apartment Therapy’s Katie Holdefehr has found several DIY statement art on a budget ideas including a DIY option using tools from your tool box, hardware store supplies like wood, fixtures, wood filler and spray paint. Other affordable options include hanging lightweight art from a half frame, inexpensive acrylic sheets (source included), a brilliant idea for framing large pieces of wallpaper and dowel rod frames on the cheap. Go to Apartment Therapy for the how-to’s.
Recent Comments